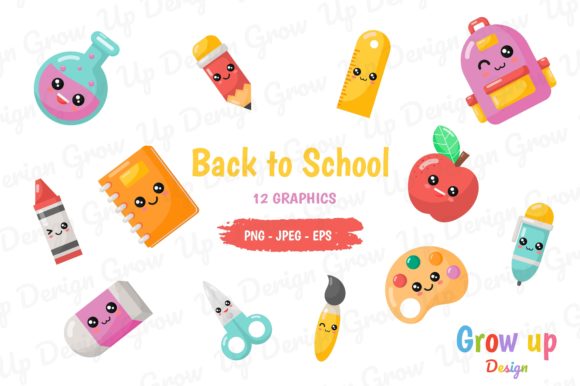
Back to School Kawaii Dictionary
If you’ve ever tried to create cute, school-themed designs—maybe for classroom decor, student planners, or social media posts—you know how time-consuming it can be to source consistent, charming artwork. The Back to School Kawaii Dictionary aims to solve that by offering a curated set of kawaii illustrations and typography in multiple file formats: AI, EPS, SVG, DXF, JPG, and PNG, all on a 1920×1280 pixel canvas. While this sounds straightforward, many people make avoidable mistakes when choosing or using such a resource. Whether you’re a small business owner, a teacher, a freelancer, or a hobbyist, understanding these pitfalls can save you hours of frustration and help you get the most from your purchase.
What Exactly Is the Back to School Kawaii Dictionary?
Think of it as a visual vocabulary list—a collection of school-related terms, objects, and characters drawn in a cute, cartoon-like style. Each item is likely accompanied by a kawaii illustration, neatly arranged on the canvas. The six file formats mean you can edit the designs in professional software (AI, EPS, SVG) or use them directly (JPG, PNG) for quick projects. The DXF format is especially handy for cutting machines like Cricut or Silhouette, letting you create stickers, labels, or iron-ons. Despite this versatility, buyers often fall into traps that reduce the resource’s value.
Mistake #1: Assuming All File Formats Work with Your Software
A common misconception is that “AI” and “EPS” files open smoothly in any graphics program. In reality, Adobe Illustrator is native for AI files, and EPS can be tricky in free alternatives like Inkscape or GIMP. Similarly, SVG files are widely supported but may lose layer organization if not handled correctly. Before purchasing, check your software’s compatibility. For example, if you use only Canva, you may be limited to JPG and PNG—which can’t be easily edited—while the vector files remain inaccessible.
Better approach: Review the listed formats and test a sample if available. If you’re a beginner, start with the SVG or PNG files and gradually learn to use vector editors. Many free programs (like Inkscape) handle SVG well, so don’t shy away from that format. For cutting machines, ensure your device accepts DXF or SVG. Knowing your workflow upfront prevents buyer’s remorse.
Mistake #2: Ignoring Canvas Size and Resolution Limitations
The dictionary is designed on a 1920×1280 pixel canvas—great for digital screens but potentially too small for large prints. Printing a JPG at poster size can result in pixelation. Beginners often assume they can scale up any image, but raster formats (JPG, PNG) have fixed resolution. The vector formats (AI, EPS, SVG, DXF) are resolution-independent, so they can be enlarged infinitely without loss. Still, many people overlook this distinction and default to the PNG, only to discover blurry edges later.
Better approach: If you need large-scale output (banners, wall art), use the vector files. Open the AI or SVG file in a vector editor, then export at the desired DPI. For small items like stickers or digital badges, the included PNG (at 1920×1280) is usually sufficient. Always check the physical size you plan to produce and calculate required pixels. A 300 DPI print of this canvas would be roughly 6.4×4.3 inches—adequate for cards, not for posters.
Mistake #3: Overlooking Licensing and Commercial Use Terms
It’s easy to assume that buying a digital design grants you full ownership, but many resources come with restrictions. The product description here says “Thank you for visiting my product,” but it doesn’t detail a license. Some sellers allow personal use only; others permit limited commercial use (selling finished products) but not redistribution of the raw files. This matters if you’re a small business owner who wants to sell notebooks, planners, or printables featuring the dictionary’s characters.
Better approach: Before purchasing, look for a clear license statement from the seller. If it’s missing, message them directly. Common allowances: use in up to 500 products, credit required, or no resale of the isolated graphics. If you’re creating a product line, ensure the license covers your intended sales volume. Ignoring this can lead to legal headaches or having to remove your listings later.
Mistake #4: Sticking Only with Raster Formats and Missing Editability
Many beginners open the PNG or JPG, make a few quick edits in a basic photo editor, and call it done. But this approach severely limits what you can do. The real power of the Back to School Kawaii Dictionary lies in its vector files. With an SVG, you can change colors, reshape elements, remove backgrounds, combine with other graphics, and scale without quality loss. By using only raster versions, you’re essentially using the dictionary as a static stamp rather than a flexible toolkit.
Better approach: Invest a little time learning the basics of vector editing. Free tools like Inkscape (for SVG/AI import) or Gravit Designer can handle many tasks. For DXF files, you can adjust cut lines in software like Silhouette Studio. Even if you don’t consider yourself a designer, knowing how to open and modify an SVG will unlock countless possibilities—customizing colors to match your brand, adjusting spacing, or combining separate illustrations.
Mistake #5: Not Verifying the Dictionary Contains All the Words You Need
The term “dictionary” suggests a comprehensive list, but what’s actually inside? Without a thorough preview, you might assume it covers every school subject, grade, or motif. Some dictionaries focus on nouns (pencil, book, apple) but skip verbs or phrases. If you’re creating a language-learning poster or a planner that needs specific words like “homework” or “recess,” you may have to supplement with other resources.
Better approach: Study the product images and description carefully. Look for a list of included terms or a sample page. If it’s not shown, reach out to the seller. Compare your project needs with the dictionary’s scope. For example, if you need “science lab” vocabulary, make sure those illustrations are present. A mismatch can force you to redesign your project or purchase additional sets, wasting time and money.
Mistake #6: Overlooking Font and Character Consistency
Kawaii dictionaries often use custom lettering or specific fonts to maintain the cute aesthetic. However, if the dictionary includes text that relies on system fonts, those fonts might not be embedded in the downloaded file. Opening the file on a computer without that font will result in automatic substitution—often turning your lovely handwriting-style words into generic Times New Roman. This is especially common with AI and EPS files that reference external fonts.
Better approach: Ask the seller whether fonts are outlined (converted to shapes) or if the font file is included. Outlined text is safe because it’s no longer editable as text, but it also can’t be changed to different words. If you need to edit the text itself, you’ll need the actual font license. A good practice is to keep a note of the font name and check if it’s free for commercial use. Many sellers also offer a PDF guide detailing these points—don’t skip it.
Mistake #7: Mismanaging the Six File Formats and Cluttering Your Drive
Receiving six separate files might feel like a bonus, but it can lead to confusion if you don’t know which one is your master copy. Beginners often edit the JPG, then later want to revert changes and find they deleted the vector file. Others accidentally move the DXF into a design program that doesn’t support it, then get frustrated. Having multiple formats can be a strength, but only if you organize them wisely.
Better approach: Decide on a single “source of truth” file—typically the AI or SVG if you have the right software—and keep it untouched in a dedicated folder. Use the other formats only for exports or specific tasks (DXF for cutting, PNG for quick previews). Name your files clearly, e.g., “BackToSchoolKawaii_Source.ai” and “BackToSchoolKawaii_FinalPrint.png”. This habit prevents accidental overwrites and makes it easy to locate the editable master when you need to make changes later.
Practical Steps to Avoid These Pitfalls
Now that you know the common mistakes, here’s a quick checklist to apply before and after your purchase of the Back to School Kawaii Dictionary:
- Assess your tools: List the software you use regularly (e.g., Adobe Illustrator, Canva, Cricut Design Space) and confirm which formats they support natively.
- Define your output: Will you be printing, screen sharing, or cutting? This determines whether you need raster, vector, or DXF.
- Preview thoroughly: Look for a full list of included words/illustrations. If unavailable, ask the seller or check reviews for sample images.
- Check licensing: Read the product description for any usage restrictions. If you plan commercial use, get explicit permission in writing.
- Test a small edit: After downloading, try opening the SVG or AI file and making a simple color change. This reveals any font or compatibility issues early.
- Back up your files: Keep the original download zip intact. Work from copies to avoid corrupting the master.
By following these steps, you transform the dictionary from a simple set of images into a reliable design asset that supports your work without hidden surprises.
Remember: A Tool Is Only as Good as Your Understanding of It
The Back to School Kawaii Dictionary offers a delightful shortcut for anyone needing consistent, cute school-themed graphics. But like any specialized resource, it works best when you know its strengths and limitations. Whether you’re a teacher creating classroom posters, a small business owner launching a planner line, or a parent making stickers for your child’s lunchbox, taking a few minutes to understand file formats, canvas size, licensing, and content scope will save you from the headaches that come with rushed assumptions. Happy designing—and may your back-to-school projects be as smooth as a freshly sharpened pencil.